One Light Studio Setup: How to Master Portrait Lighting With Minimal Gear
If you've been waiting until you own more equipment to shoot seriously in the studio, this post is your permission slip to stop waiting. A one light studio setup is not a beginner's compromise. It is a deliberate, powerful approach to portrait photography that forces you to understand light before you add more of it.
With one quality strobe, a modifier or two, and a little intentionality, you can create portraits that look like they came from a full production setup. I know this because I shoot this way all the time, and I teach it to photographers in my workshops because it is, without question, the fastest way to build real lighting confidence.
Here is exactly how it works using three fundamental techniques: bounced light, hard light, and modified light.
Why Start With a One Light Studio Setup?
Before we get into technique, it's worth understanding why one light is worth mastering on its own before adding more.
When you only have one light source, every decision you make matters. You cannot hide a weak understanding of light direction behind a second fill light. You learn what shadows actually do to a face, how distance controls contrast, and how height changes the entire mood of an image. That foundation makes every future lighting decision sharper and more intentional.
One light also means faster setups, fewer variables to troubleshoot, and more creative energy left over for the actual shoot.
The Three One Light Setups You Need to Know
Bounced Light: Soft, Natural, and Forgiving
Bounced light is exactly what it sounds like: instead of pointing your light directly at your subject, you aim it at a nearby surface and let the reflection do the work.
In practice, I bounce a speedlight off a large white wall. The wall becomes the light source, which means the light wrapping your subject is much larger and softer than the original flash head. Shadows are gentle, skin tones are even, and the whole image takes on a natural, available-light quality.
This is a great setup for e-commerce, clean headshots, and anyone who wants professional results without the drama of harder lighting.
What makes it work: The larger the surface you're bouncing off, the softer and more diffused the light. Keep your subject close enough to the wall that the reflected light is still strong, but far enough from the background that you get a little separation.
Gear used: Godox Speedlight

Hard Light: Dramatic, Directional, and Intentional
Hard light gets a bad reputation because most people encounter it by accident rather than on purpose. Harsh overhead fluorescents, direct midday sun, a bare flash pointed straight at someone's face with no forethought. That is not hard light as a tool. That is hard light as a mistake.
When you use hard light intentionally, it becomes one of the most powerful looks in portrait photography. Sharp, defined shadows create texture and dimension. The image has weight. The subject looks like they belong in a magazine or a campaign.
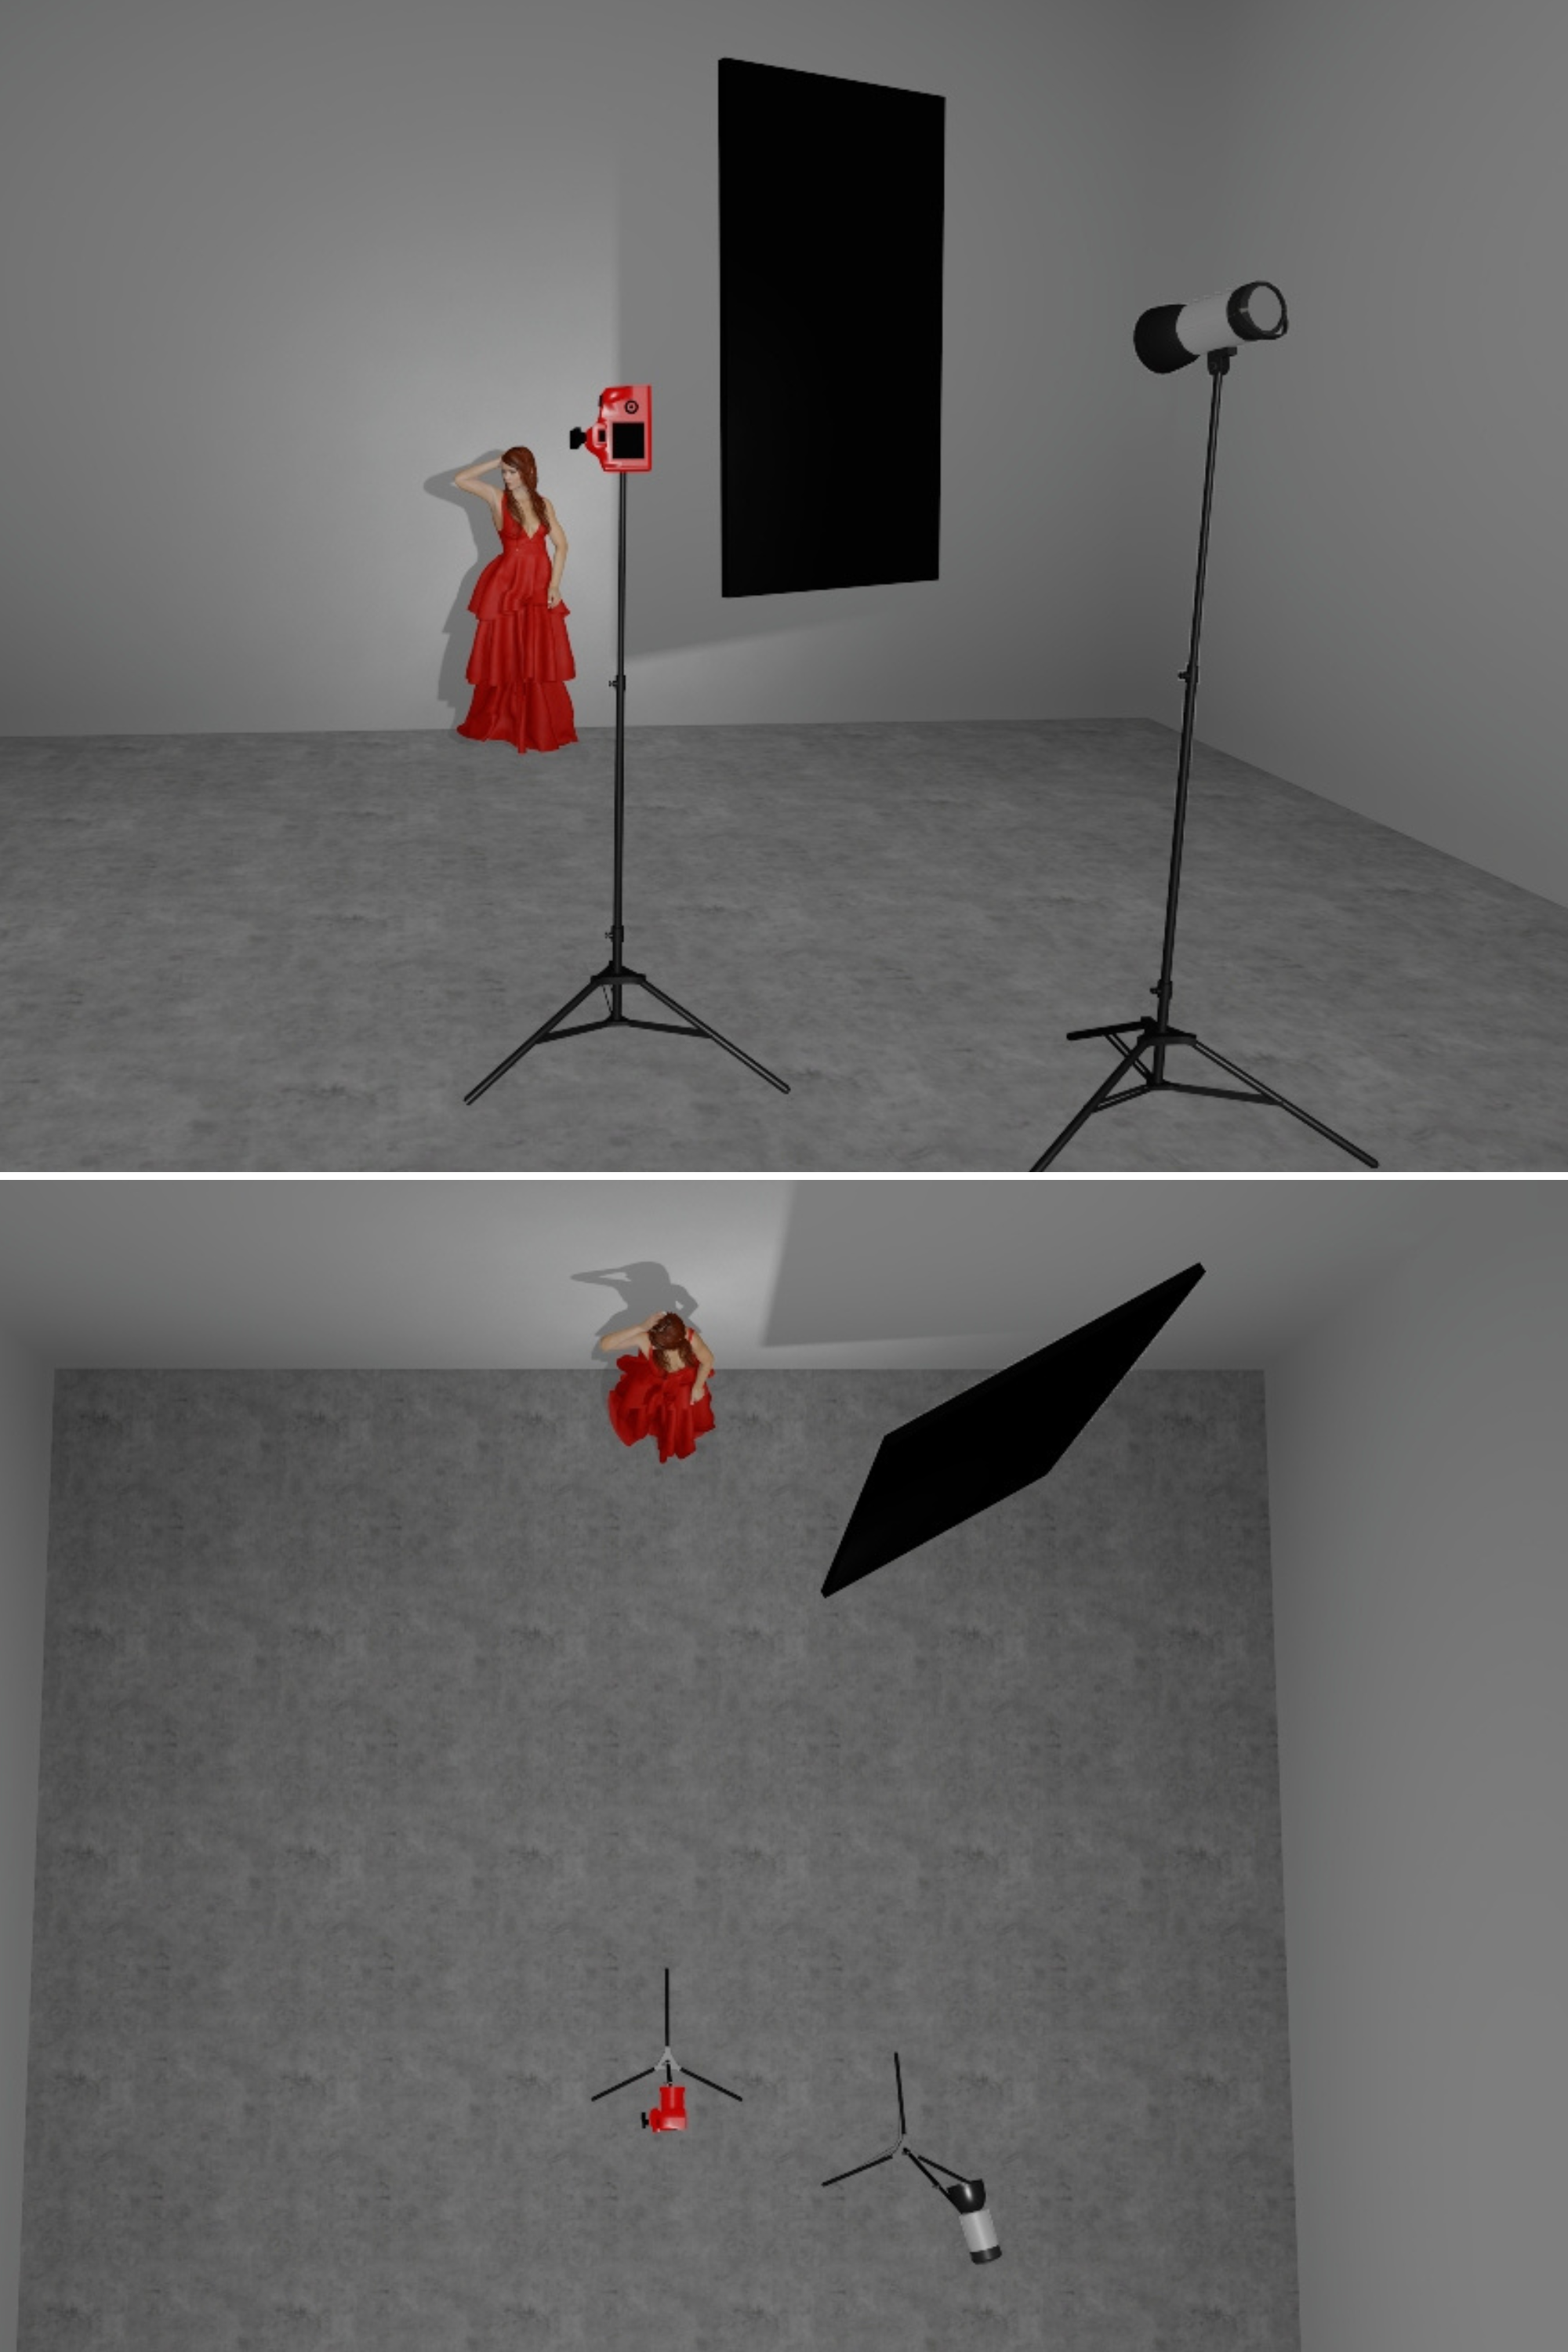
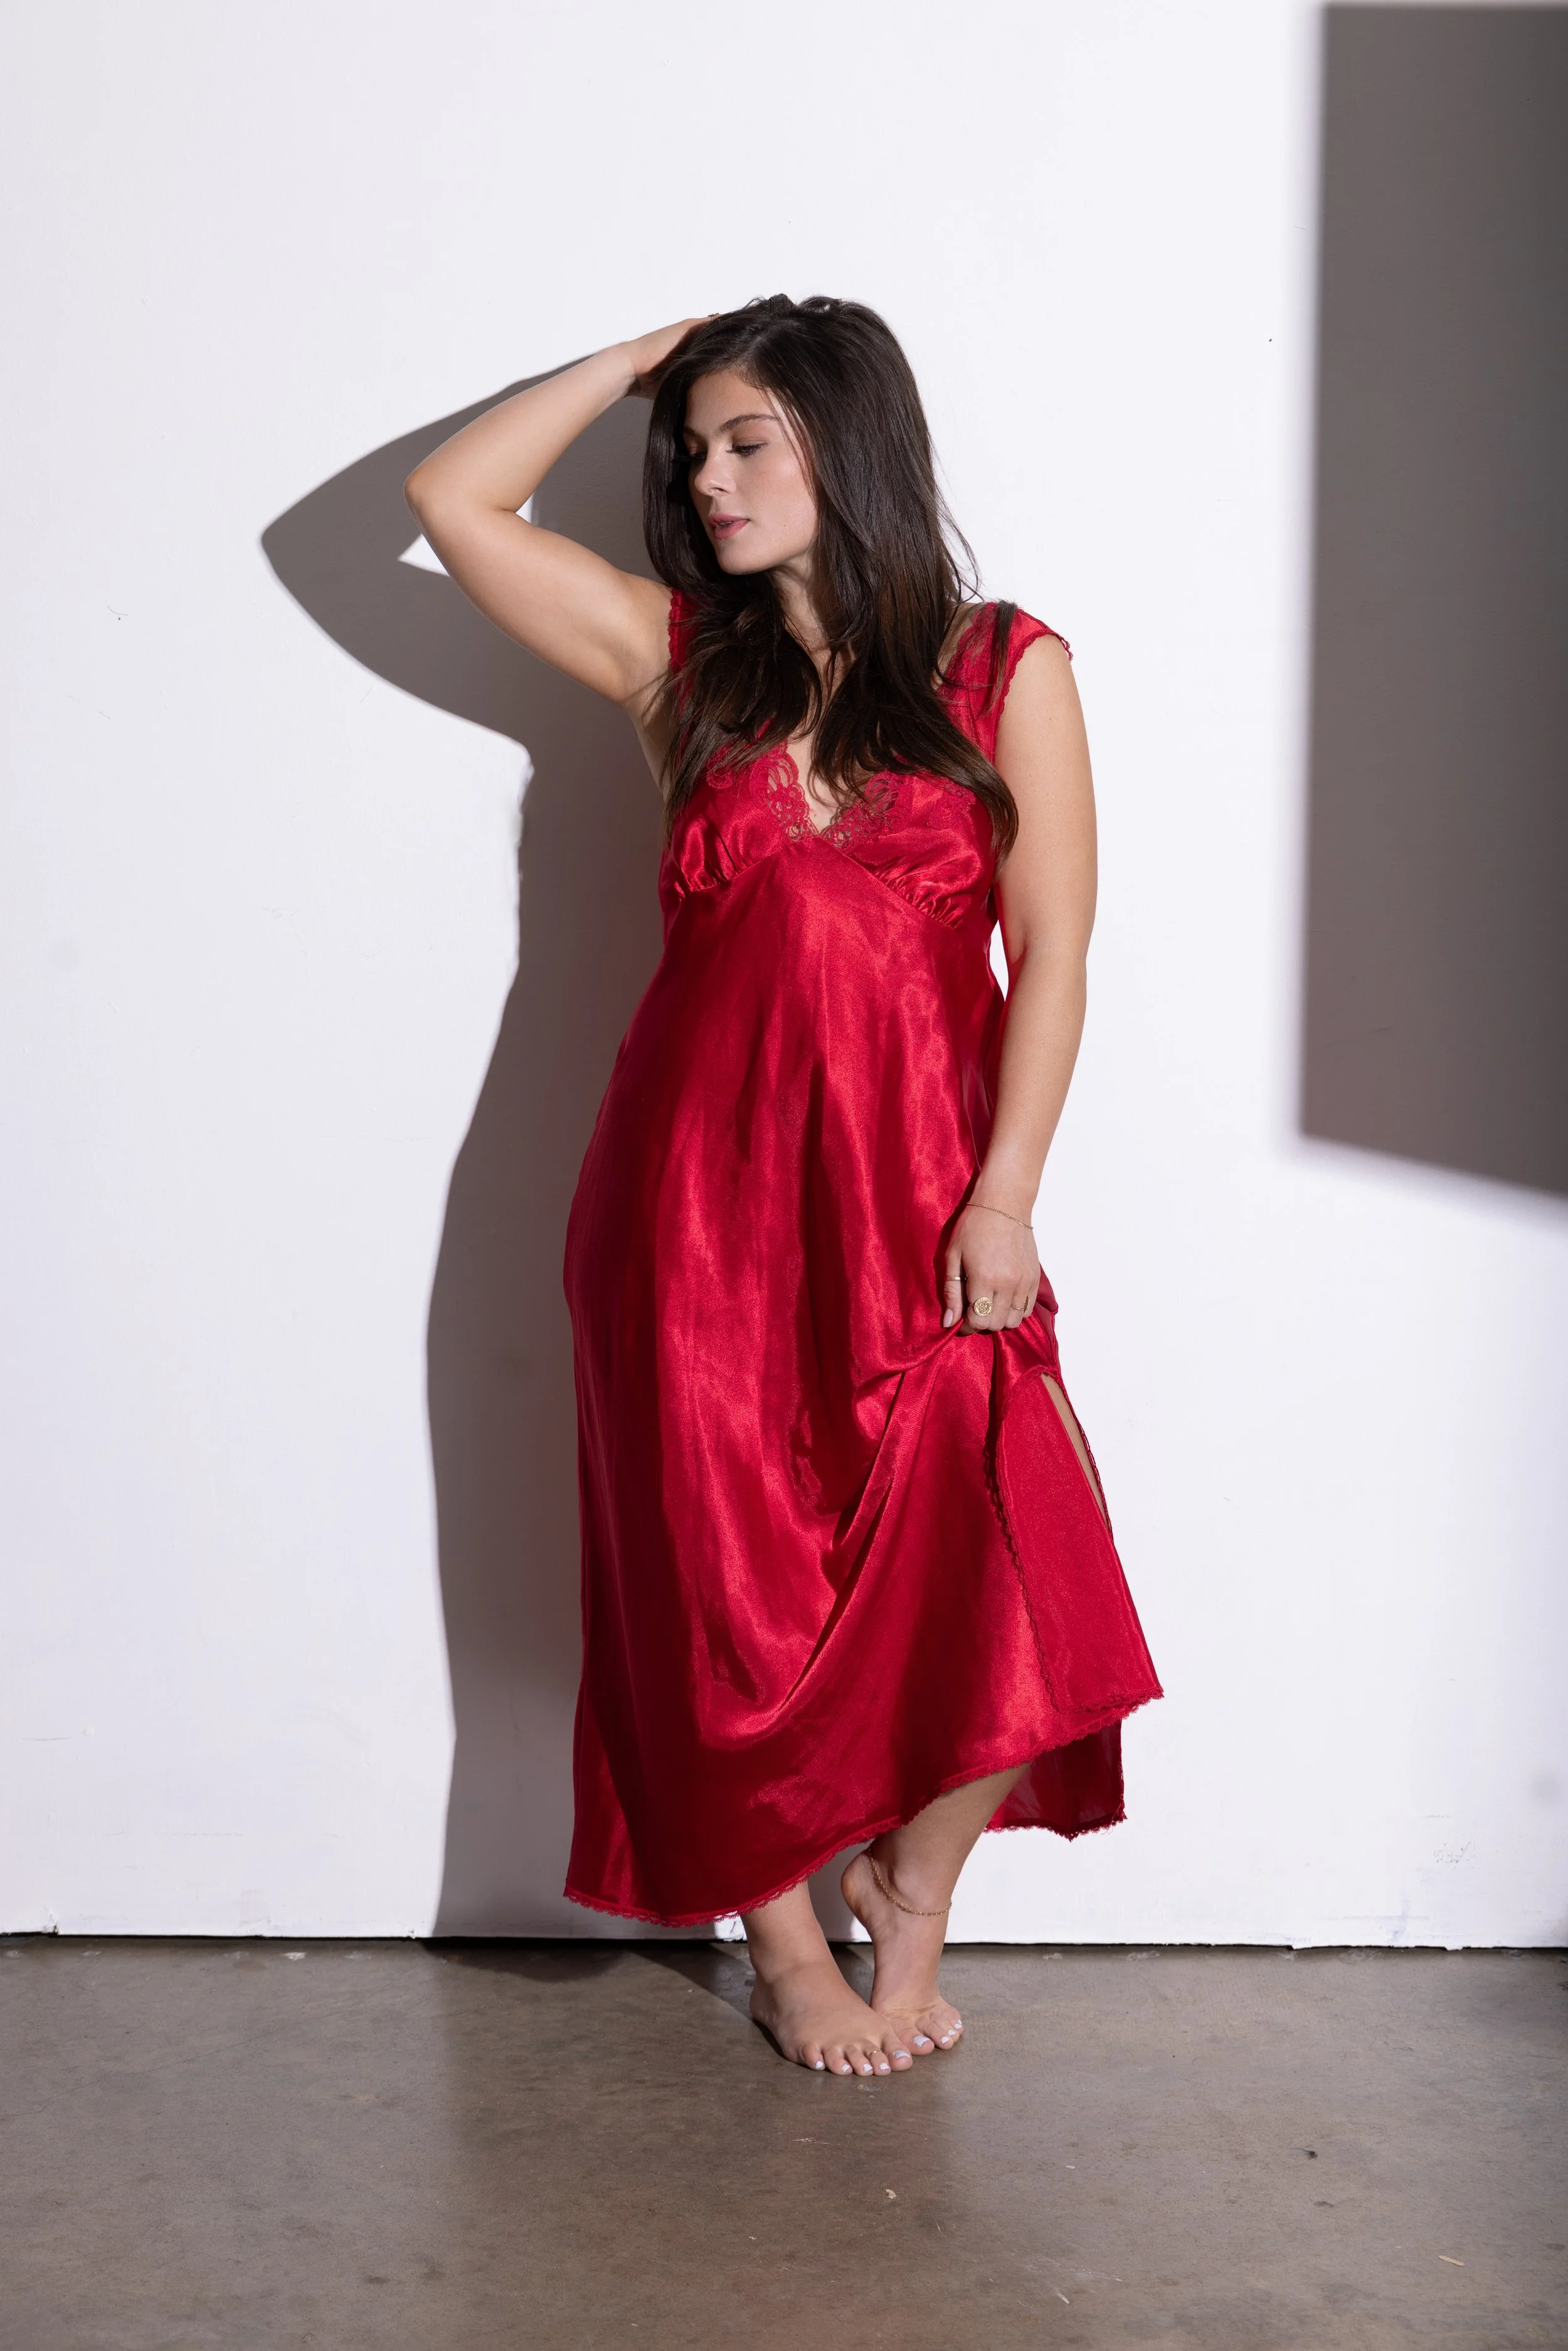
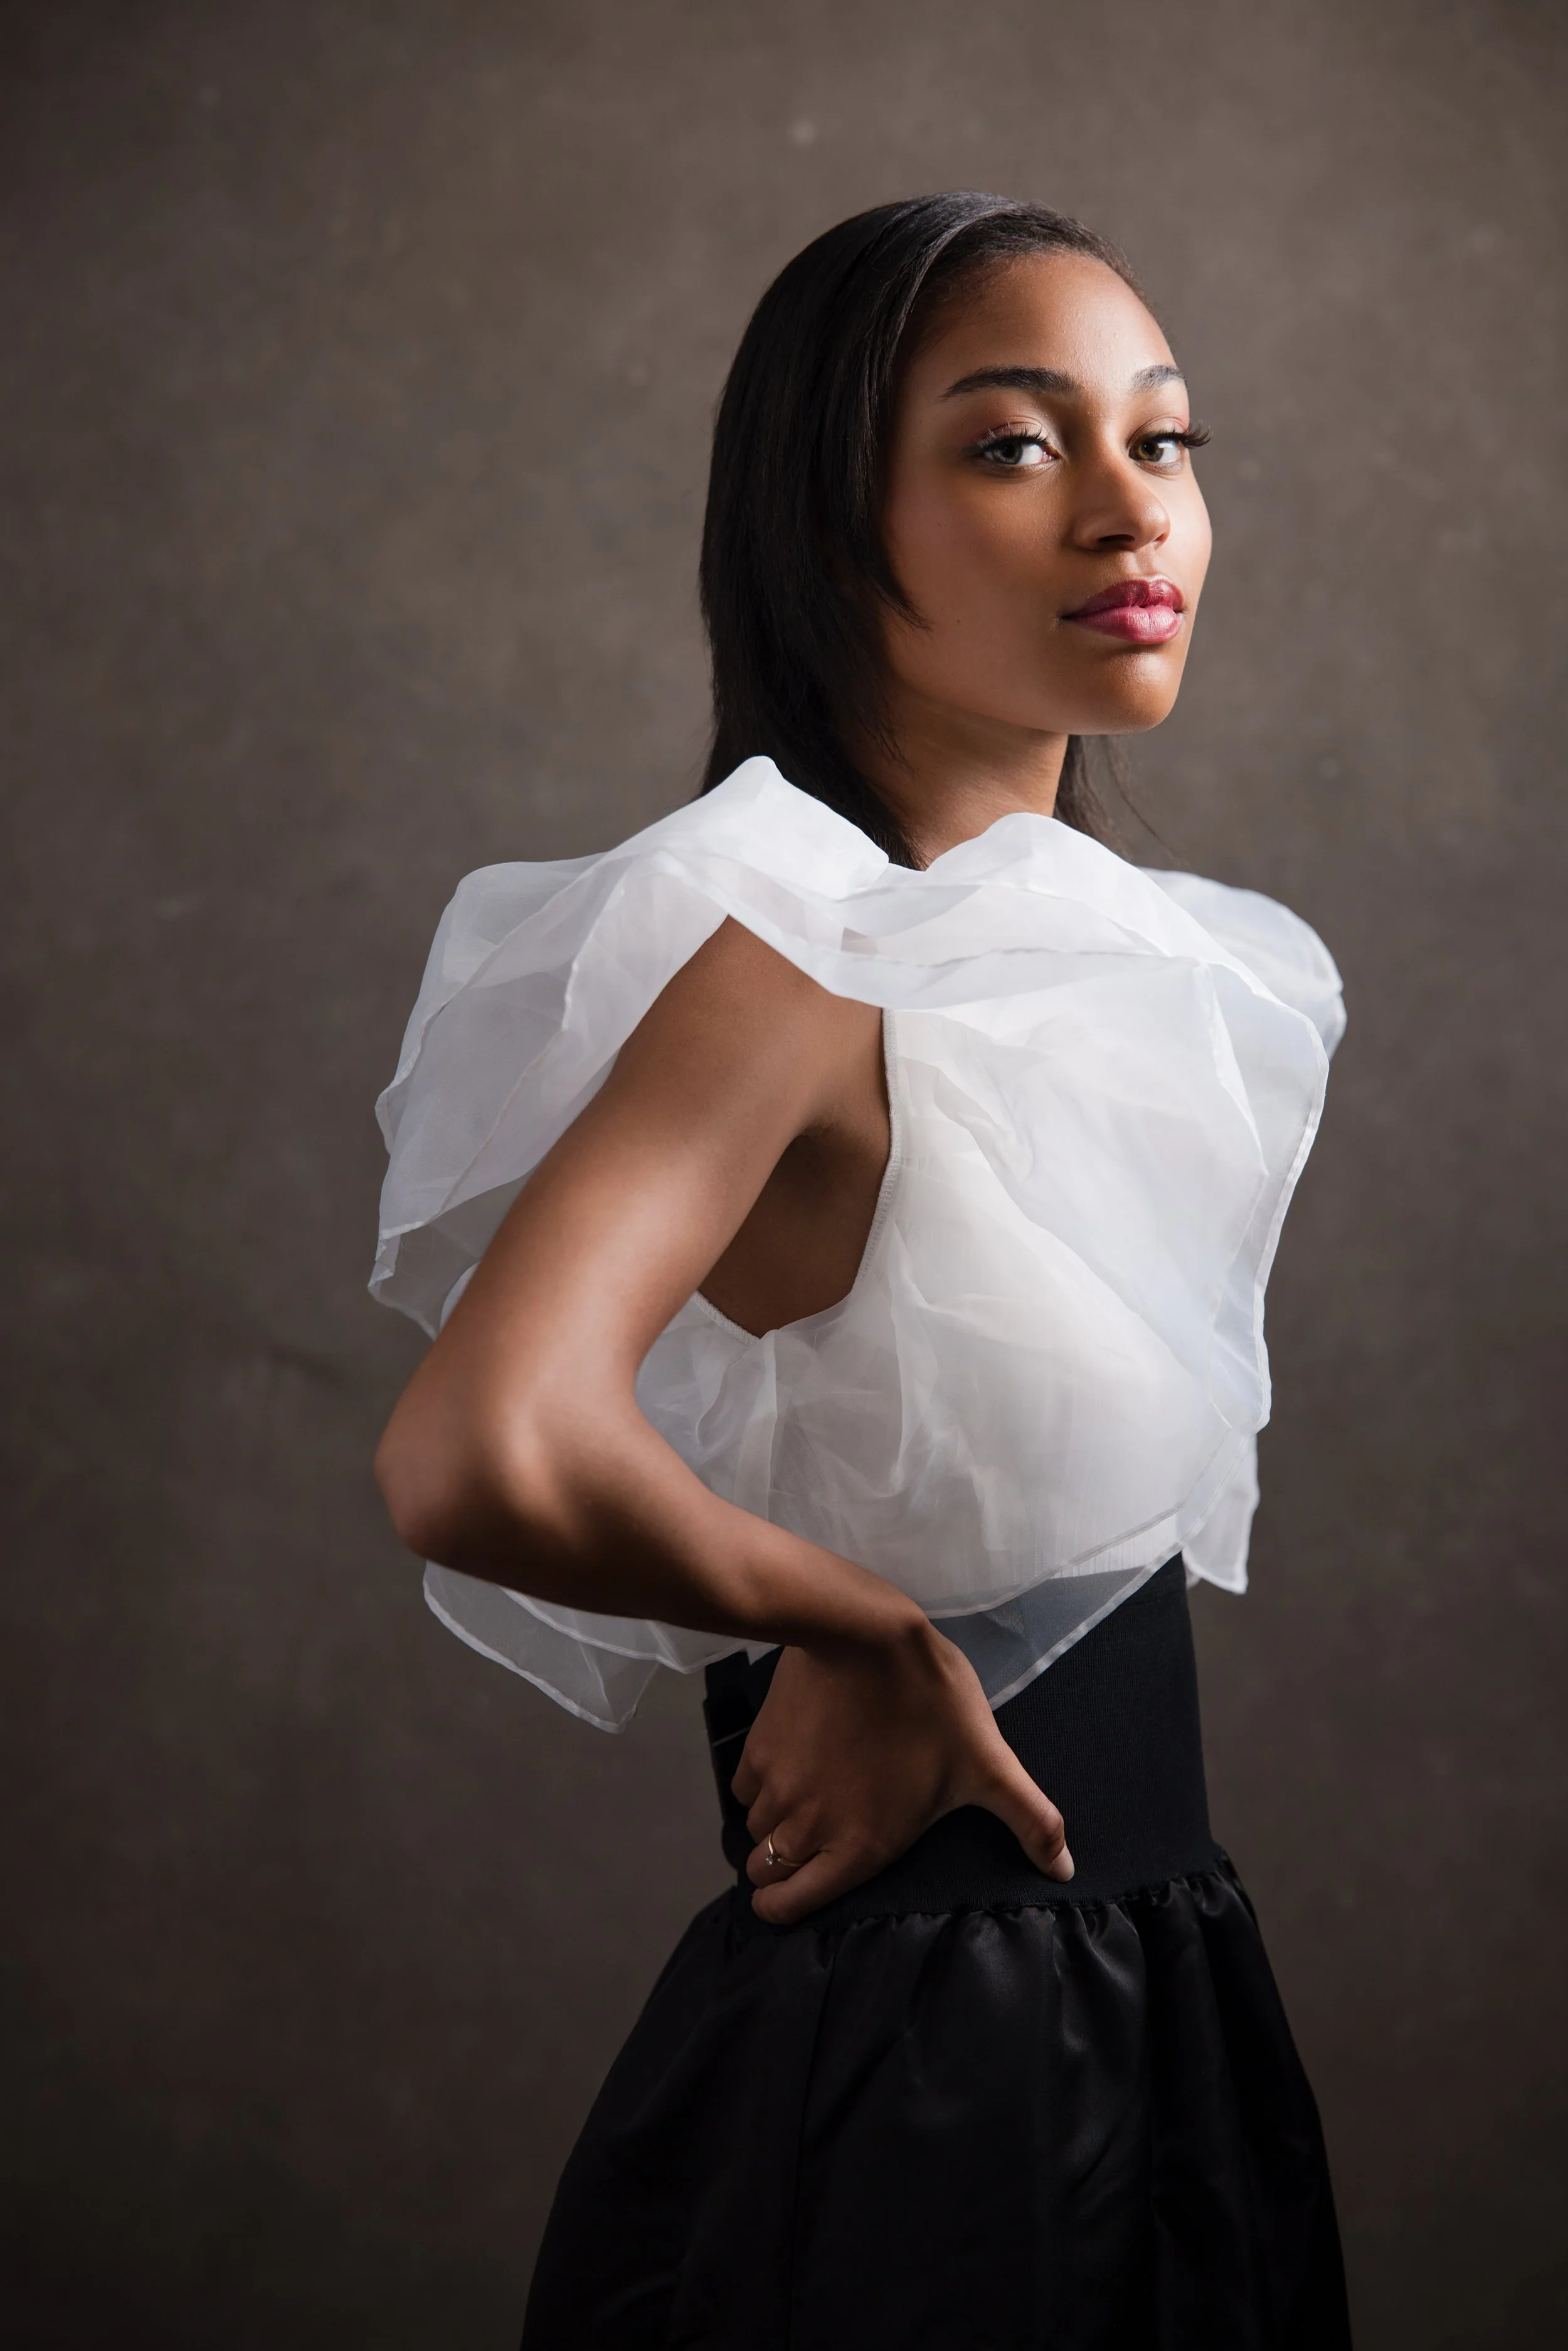
For this setup, I position the Profoto D2 slightly camera right, in front of the subject with no diffusion or bounce. The direct, undiffused output creates strong, crisp shadows that emphasize facial structure and contour. The key is controlling exactly where the shadows fall, which is a matter of adjusting the light's position in small increments until the shadow pattern reads as intentional rather than accidental.
What makes it work: Distance is your contrast dial. Move the light closer for more dramatic falloff. Move it farther for slightly softer transitions. A small flag or V-flat can block spill and sharpen the shadow edge even further.
Gear used: Profoto D2
Modified Light: Controlled, Flattering, and Versatile
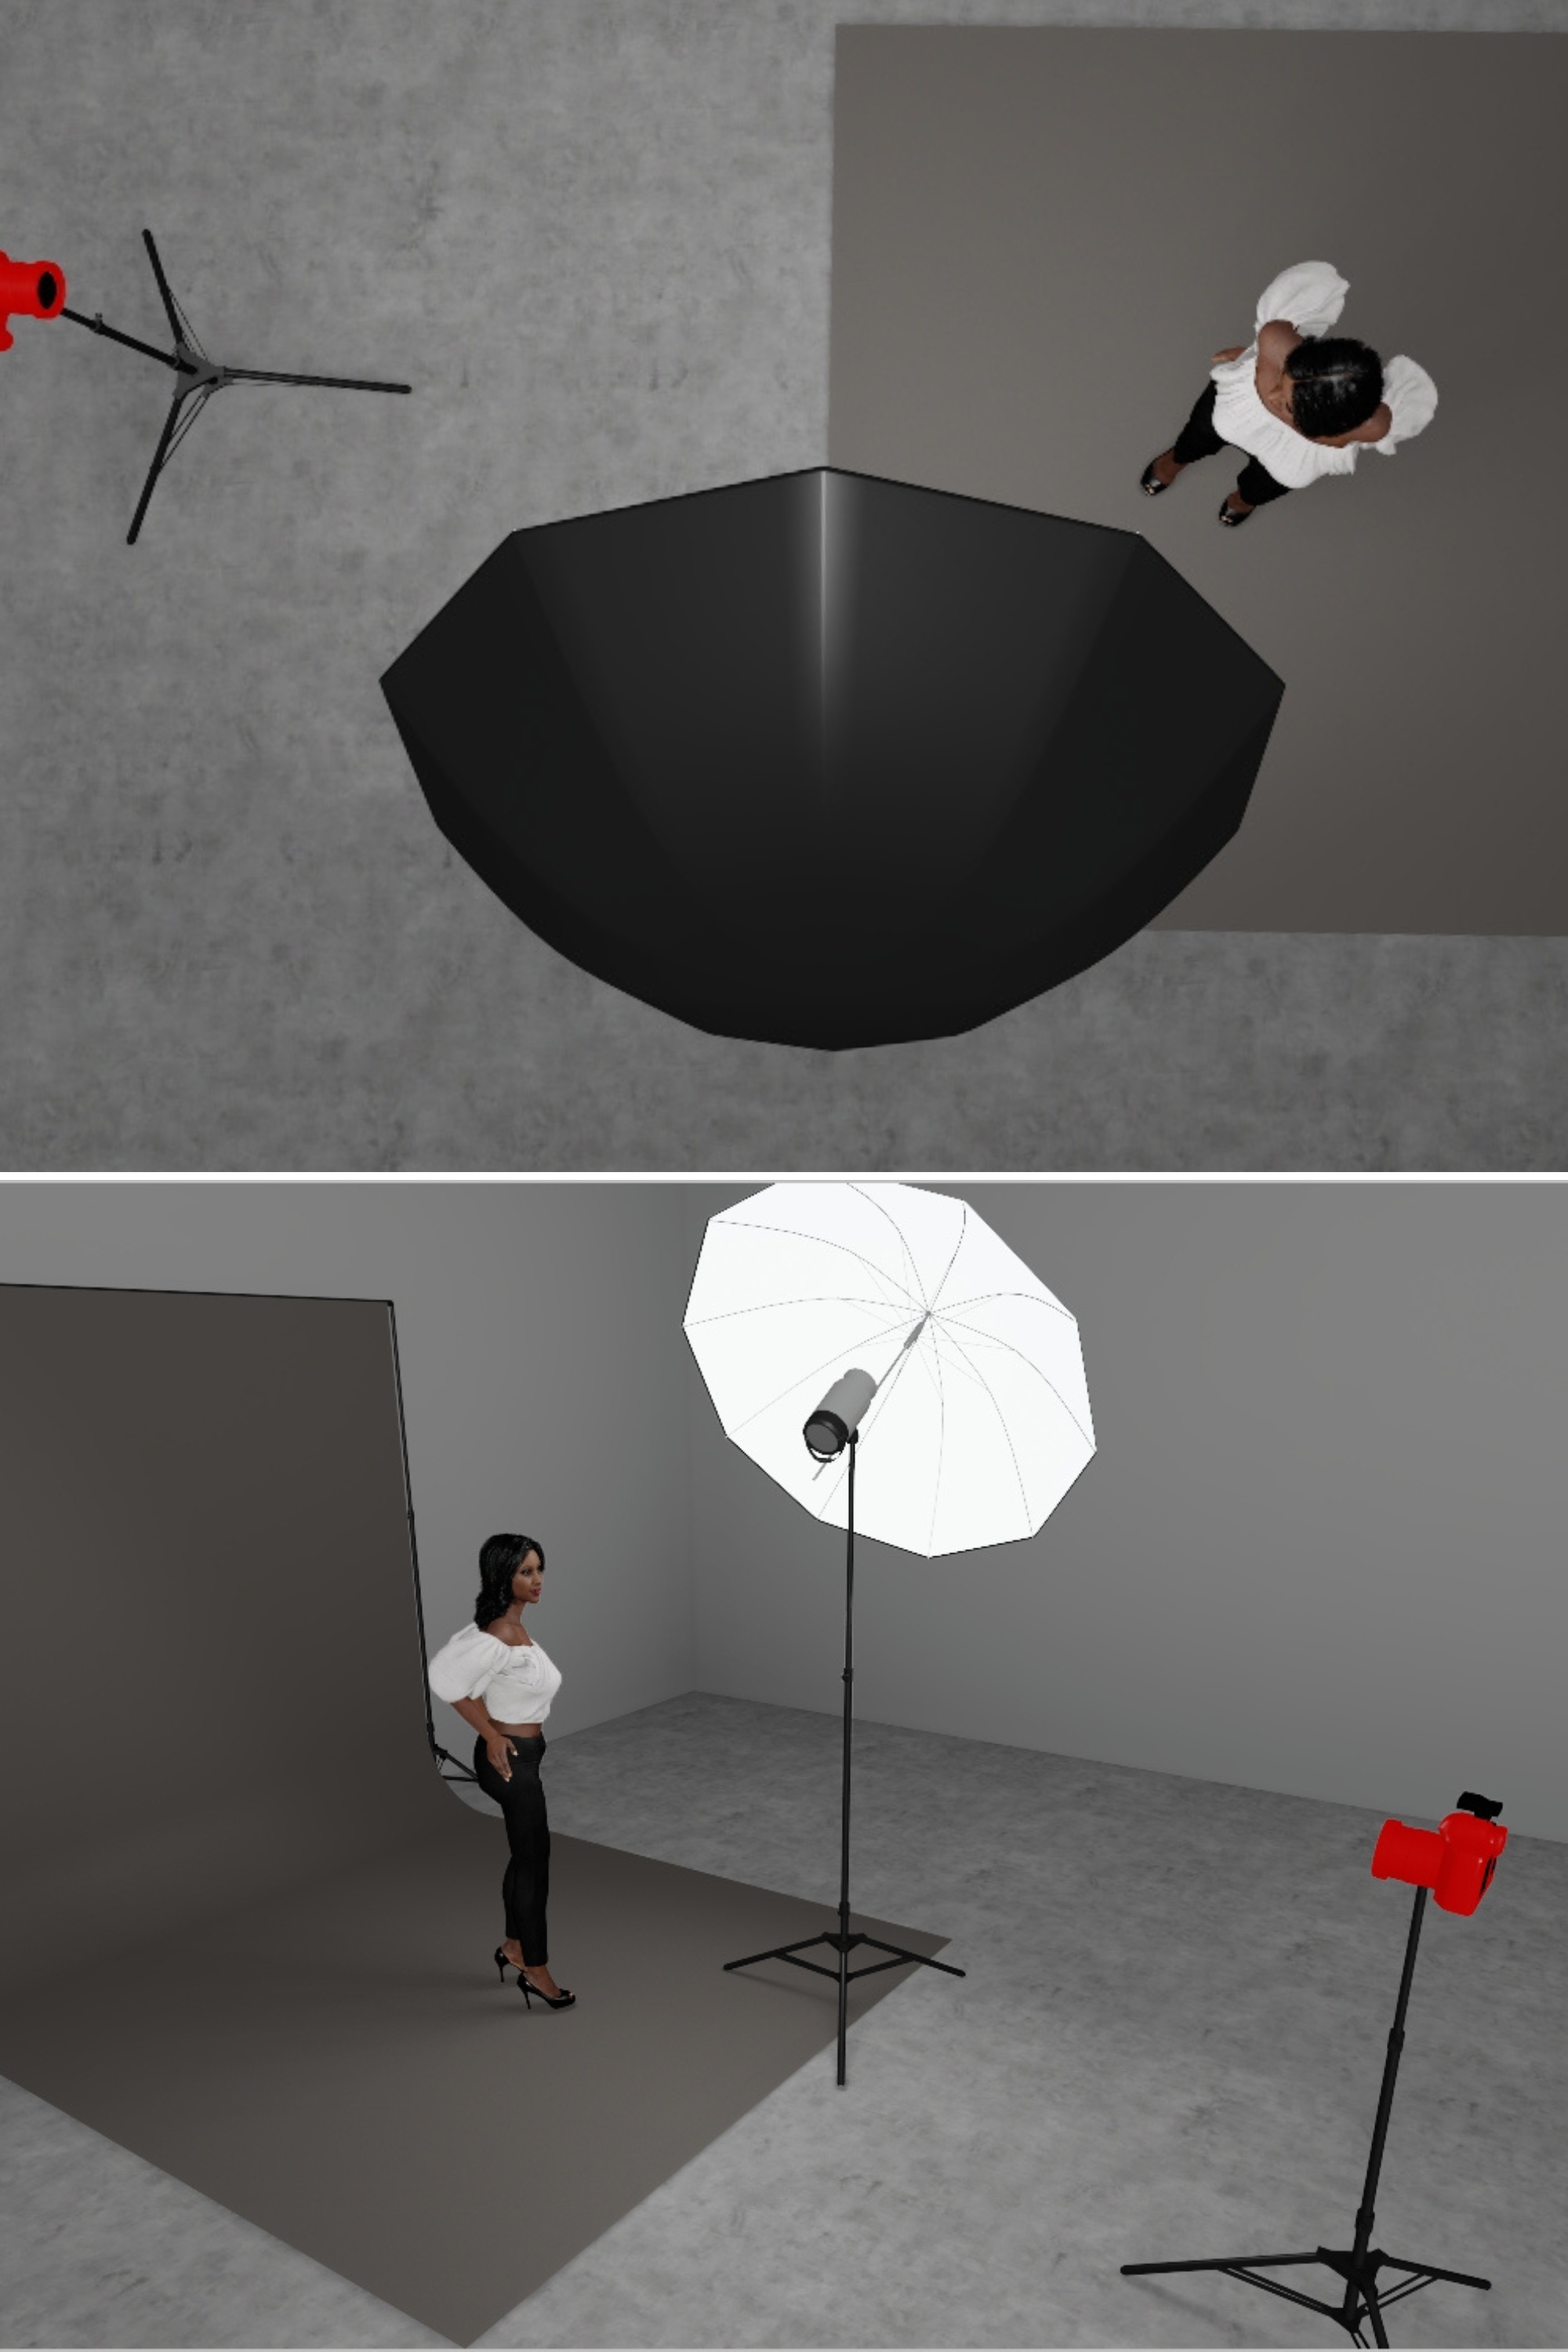
Modified light sits between the extremes of bounced and hard. You are still using a direct light source, but a modifier changes the quality of what hits your subject. Softboxes, strip boxes, umbrellas with diffusion fabric, beauty dishes: each one shapes light differently and produces a distinct result.
For a beginner or anyone working to build a consistent, professional one light portrait, I recommend starting with an umbrella with diffusion fabric. It is affordable, forgiving, and creates soft, flattering light without requiring complicated adjustments. The umbrella spreads light broadly, which makes it easier to learn how direction and distance affect your subject before you start exploring more sculpted modifiers.
In this setup, the umbrella is positioned to create a soft, even glow that wraps the subject while still maintaining enough directionality to show dimension. The result is polished and professional, and it works on almost every face shape and skin tone.
What makes it work: The larger the modifier, the softer the light. Position it close to your subject for maximum softness and wrap. Pull it back to introduce more contrast and edge.
Gear used: Profoto D2, Umbrella with diffusion fabric
How to Choose Between the Three Setups
The right setup depends on the mood and purpose of the image.
Bounced light works best when you want a natural, approachable feel. It reads as friendly and accessible, which makes it strong for headshots, personal branding, and e-commerce.
Hard light works best when you want drama, edge, or editorial weight. It reads as bold and confident, which makes it strong for artist portraits, advertising work, and any image where the subject needs to command attention.
Modified light with an umbrella or softbox works best when you want the middle ground: professional polish with approachable warmth. It is the workhorse setup for most commercial headshots because it is reliable, repeatable, and flatters a wide range of subjects.
Start with one. Learn it fully. Then try the others.
If you are curious what you need to get started check out my lighting setups.
Adding a Second or Third Light Later
Once you can consistently control a single light, adding more becomes a creative decision rather than a problem-solving one. A second light might be a rim light for separation, a hair light for dimension, or a background light to change the mood of the space behind your subject.
If you're ready to see how I build from one clean light into layered two and three light setups for artist portraits, this post walks through the full progression: Minimal Lighting, Maximum Drama: From 1 to 3 Lights in Artist Portraits.
And if you want to see a constant light, a ceiling bounce, and fabric backdrops put to work on a real branding client, this behind-the-scenes breakdown of the Amanda Johansen shoot is worth a look: Creative Studio Portrait Lighting: Three Setups, Three Completely Different Stories.
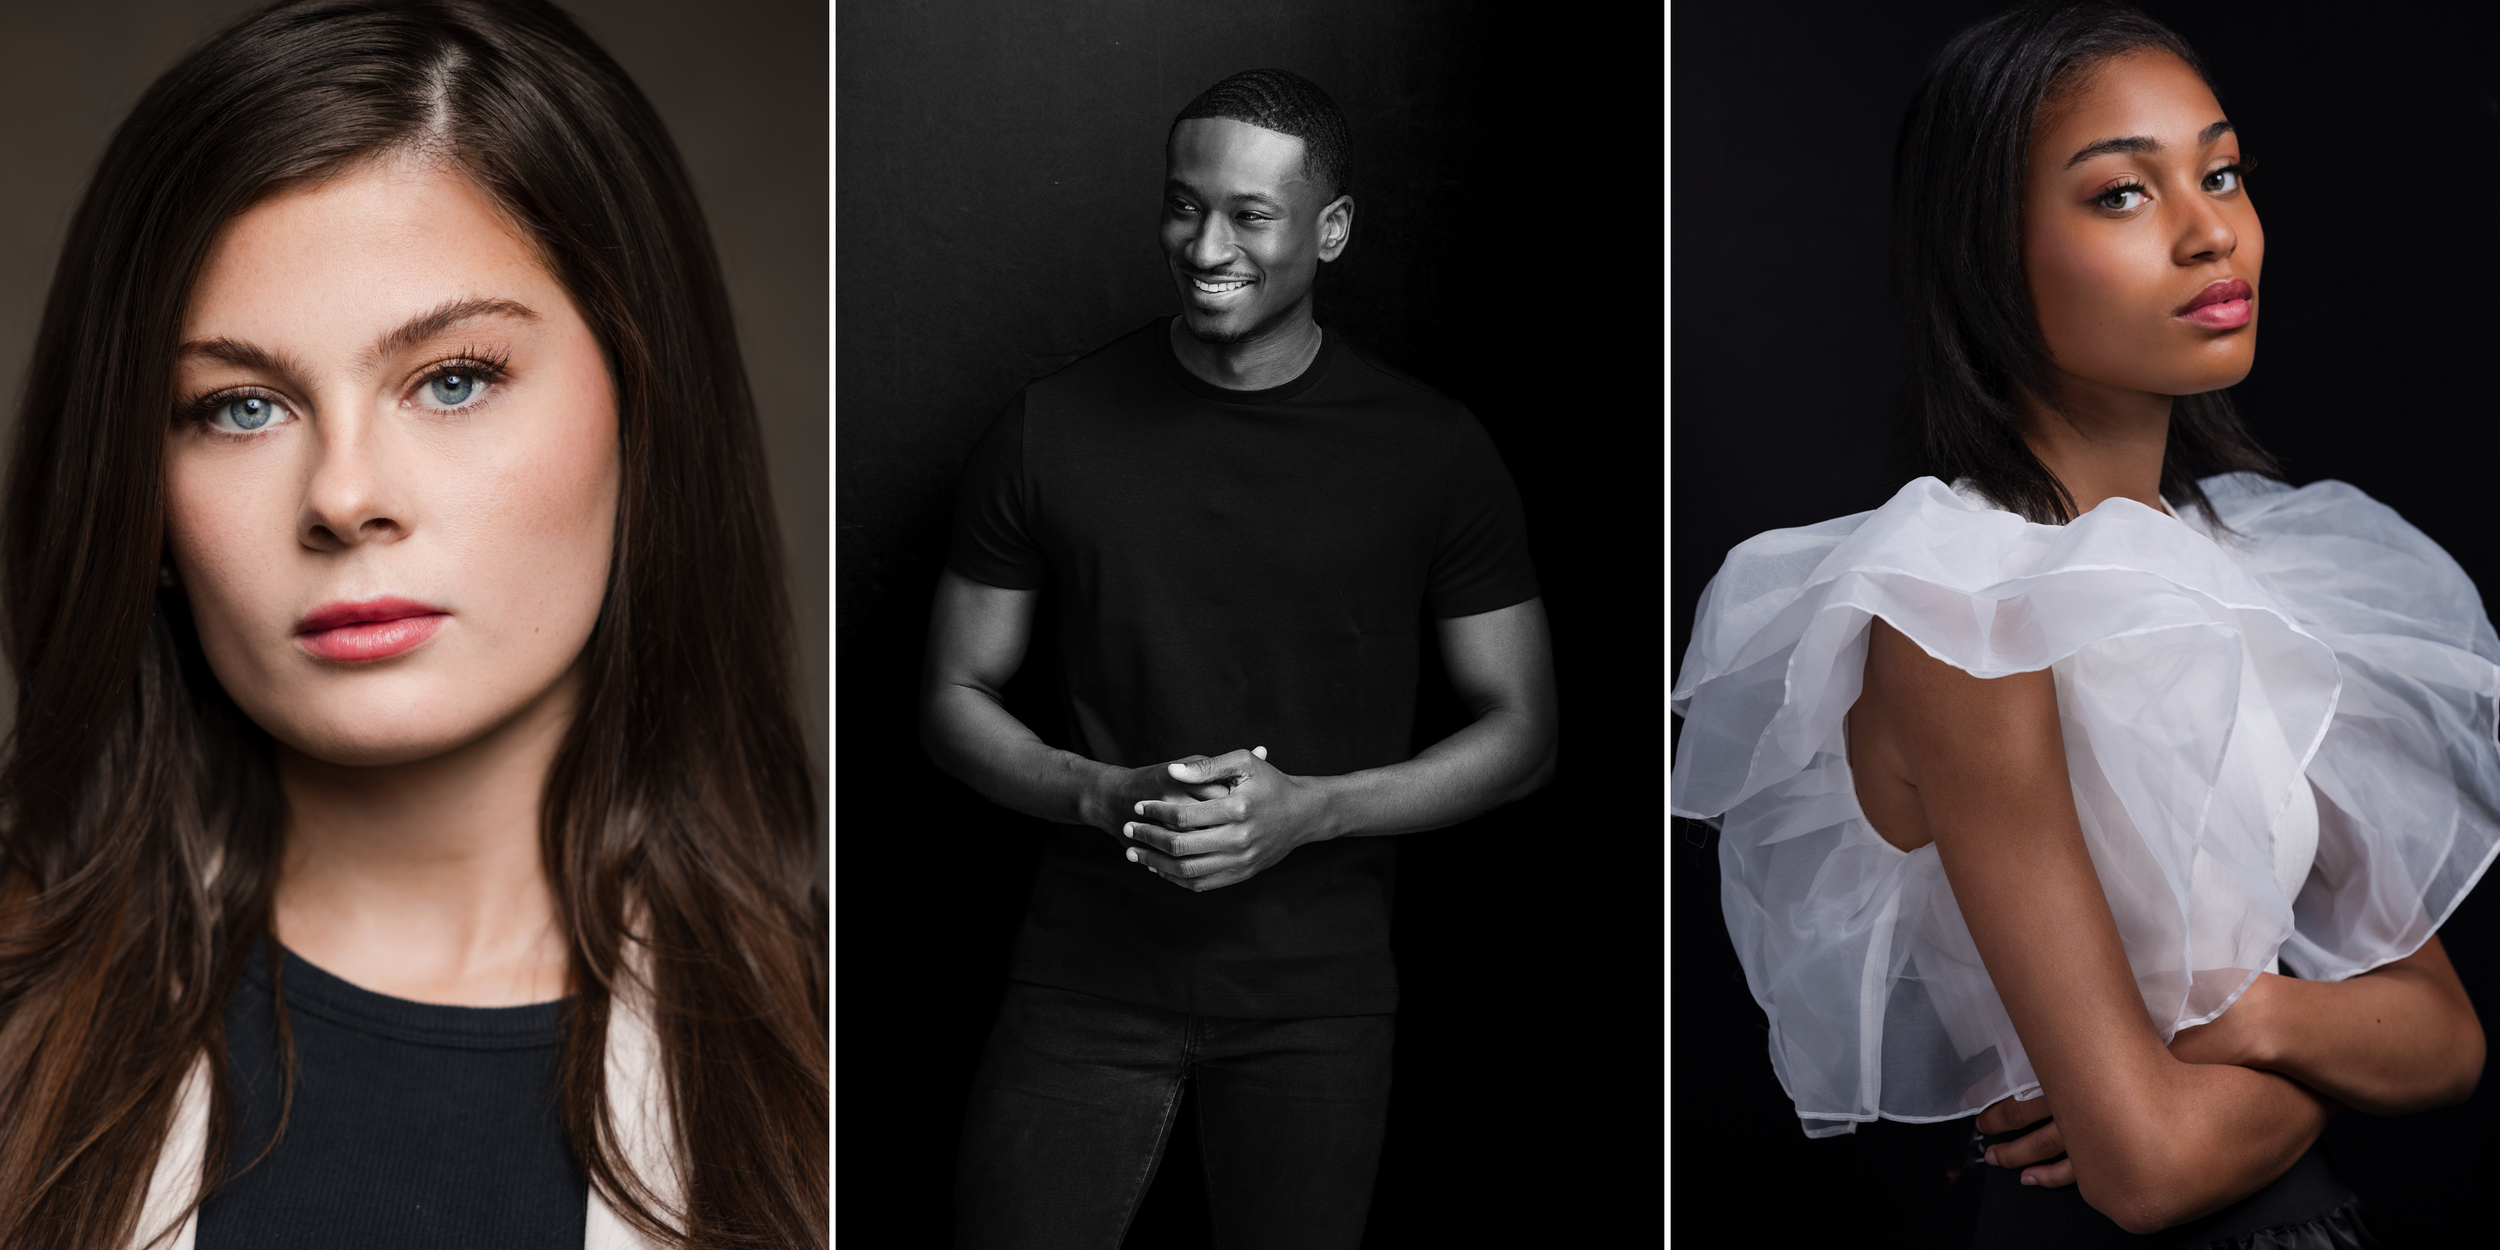
What Photographers Created With These Setups
These images were made by photographers who attended my One Light, Endless Possibilities workshop right here in Nashville. No extra gear. No advanced lighting experience required. Just one light, the three techniques above, and the willingness to experiment.


"Tausha takes it step by step, nice and slow, so you understand why you are doing what you are doing. This workshop would be really good for someone who understands on-camera flash or more basic off-camera and wants to up their game. If you are a photographer who doesn't understand all the math equations that go with photography, it's ok, you are not alone. This workshop would be perfect for you."
Darcy Ferris, Photographer
Every one of these images came from a photographer who walked in unsure and walked out with a full card of work they were proud of. That is what happens when you stop overthinking the gear and start understanding the light.


Photo by Elaine Drabik
Photo by Elaine Drabik"She's awesome—so positive, smart, and talented! The positive atmosphere and how you were an open book of anything and everything we wanted to know really made the experience enriching and enjoyable."
Elaine Drabik, Photographer


"Tausha D. is the best! The workshop was not too technical and easy to understand. It really helped to see the real-life and hands-on examples of lighting that I had read about. And she's the most fun."
H.N. James, Photographer
Understanding light on paper is one thing. Seeing what it actually does to a real face, in real time, with your hands on the gear, is something else entirely. I offer small-group photography workshops and private mentoring sessions focused on exactly this: studio lighting fundamentals, subject direction, and building creative confidence without the overwhelm.
If you're a photographer ready to stop guessing and start seeing light with intention, I would love to work with you. Learn more about workshops and mentoring here.
***affiliate links*** I may be paid a small commission for items you buy. Read my affiliate disclosure hereFrequently Asked Questions About One Light Studio Photography
What is a one light studio setup?
A one light studio setup uses a single key light to create shape, depth, and dimension in a portrait. Rather than relying on multiple lights, you control how shadows fall across the subject by adjusting the light's direction, height, and distance. Mastering one light builds stronger technical understanding and creative confidence than starting with multiple lights.
What is the best modifier for a one light portrait setup?
For most photographers starting out, an umbrella with diffusion fabric is the best first modifier. It is affordable, quick to set up, and creates soft, flattering light without complicated adjustments. Once you're comfortable controlling direction and distance with an umbrella, you can explore softboxes, strip boxes, and beauty dishes for more sculpted results. See my full photography gear list.
Can you get professional results with just one studio light?
Yes, consistently. Professional portrait and headshot work often relies on one well-placed key light and precise shadow control. When you understand how to shape a single light source, you can create images that feel polished and dimensional without additional complexity. Many commercial and editorial photographers shoot with a single light by choice, not by limitation.
Where should I position one light for studio portraits?
A strong starting point is slightly above eye level and angled down toward the subject at about 45 degrees. This creates natural depth and dimension across the face. Small adjustments in angle and distance can dramatically shift the mood and contrast of the image.
What is the difference between bounced, hard, and modified light?
Bounced light is reflected off a surface before reaching the subject, producing soft, even illumination. Hard light is direct and undiffused, creating sharp shadows and dramatic contrast. Modified light uses a tool like a softbox or umbrella to change the quality of the light, offering control over how soft or directional the result is. Each technique produces a distinct look and serves different creative purposes.
Is one light enough for commercial headshot photography?
In many cases, yes. A strong commercial headshot often relies on one intentional key light and careful shadow control. When you fully understand how to shape a single source, you can create images that feel polished and dimensional without unnecessary complexity. Many of the headshots I photograph for executives, professionals, and branding clients in Nashville and Franklin TN are lit with one to two primary lights.